
by Michael Kercsmar | Jan 16, 2019 | Software
This is a project that started as something small but has grown over time. I wanted a simple script that would snap a picture and upload it to a ftp site once a day. With that script I could keep an eye on my yard when I was traveling. As time went on, I wanted easier access so I replaced the ftp site with DropBox. Then I wanted more images so once a day went to once and hour. As so on… (more…)

by Michael Kercsmar | Dec 2, 2018 | How To, Software
For an upcoming project I needed to upload files to Dropbox from the command line. There is a tool that supports transfers to & from Dropbox but the setup requires a few coordinated steps. This quick how-to is what you need to get started.
(more…)

by Michael Kercsmar | Jul 27, 2017 | Software
I have been using the DietPi distribution on my Raspberry Pis for a about a year now and it has become my go-to for doing quick projects. It is a lightweight distro that is based on Debian. It automates many of the more complicated tasks required with setting up and updating a Linux SBC and it includes an impressive list of ‘standard applications.’ There are two items that are the most convenient for my lab. First, DietPi is not just a Raspberry Pi distro. It supports about 30 different single board computers and virtual machines. That is important for me because I am trying new boards as they are released. The second big factor is the automated setup. I will be doing a blog post dedicated to that topic in the future. (more…)
by Michael Kercsmar | Mar 5, 2015 | How To, Software
PhantomJS is an awesome tool for web testing, web scraping and complex scripting. In a future post I will be talking about how to use PhantomJS to check and report on cell plan use. Because the Raspberry Pi 2 is new, no one has created a PhantomJS repository entry so before I could use it on my Raspberry Pi 2 I had to compile it from scratch. The PhantomJS team has done a super job automating most of the process (check out the instructions here) but a few tweaks are needed for the RPi2. (more…)
by Michael Kercsmar | Feb 25, 2014 | Software
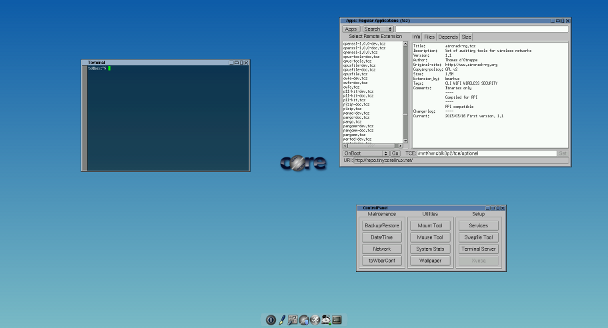
For advanced users – If you need a minimal distribution that includes a GUI and run entirely out of RAM, TinyCore might be right for you. It includes only a minimal set of tools that you can use to build up a complete system with only what you need. The complete announcement can be found here http://forum.tinycorelinux.net/index.php/topic,16551.msg98689.html and a review is here http://www.linuxuser.co.uk/reviews/picore-5-1-review-tinycore-comes-to-raspberry-pi. I will say that I do not entirely agree with the review and I give TinyCore higher marks than the reviewer.
UPDATE TinyCore v6.0 is now available here

by Michael Kercsmar | Feb 21, 2014 | Software
In my last post about QEMU I showed how easy it was to emulate the Raspberry Pi in Windows. If you are just getting started with the Pi, that is the way to go. Personally, I prefer to use Arch Linux over Debian. There is nothing wrong with Raspbian, I am just used to how Arch Linux works. But, emulating Arch Linux under QEMU is not that simple. To start, not everything can be found in one easy download package. But, I worked through the problems and here are the instructions:
- To start,you will need a working QEMU working Rasbian to modify the Arch Linux img file. Follow the instructions in this post to get Raspbian running.
- Next, download QEMU 1.6 from QEMU FOR WINDOWS (52MB). Extract in a different location from the Rasbian install.
- Download the latest Linux kernel for QEMU from http://xecdesign.com/downloads/linux-qemu/kernel-qemu NOTE: http://xecdesign.com/qemu-emulating-raspberry-pi-the-easy-way/ has some great information about QEMU and the Raspberry Pi
- Download the latest Arch image from http://archlinuxarm.org/platforms/armv6/raspberry-pi
- Before we boot the Arch image we are going to make a few changes to the img file. One, it needs to be bigger and have a swap partition and two, the way the Arch image specifies the boot partition does not work with QEMU. We need to modify the /etc/fstab to make it work.
- Add 2 GB of space to the fake SD card with the following command (in Windows)
qemu-img <Arch img filename> resize +2G
- Next, we will add the Arch img as a second drive in Rasbian. Add the following to the BAT file that starts the Rasbian QEMU session
-hdb ArchLinuxARM-20##.##-rpi.img
Add the correct date code for you file. That addition puts the Arch img on /dev/sdb when you start Rasbian.
- Start Rasbian. Watch the messages to see that the sdb partitions are now available. Don’t worry if the message go by too quickly, the next step can also check.
- Now create the swap partition. Login and use
sudo fdisk /dev/sdb and create a linux swap partition. Detailed instructions are here. The next step shows how to edit the fstab to make the swap used at boot.
- Next, we will mount the Arch partition and edit the fstab. Do the following:
sudo mkdir /mnt/arch

sudo mount /dev/sdb5 /mnt/arch

sudo nano /mnt/arch/etc/fstab
- In fstab, change the /boot line from /dev/mmcblk0 to /dev/sda1
- Add the following as the list line to activate swap on boot
/dev/sda3 none swap defaults 0 0
- Save fstab, exit nano and umount /mnt/arch.
- Halt Rasbian and move the Arch img file to the QEMU 1.6 install directory
- Arch can be started with the following command
qemu-system-armw.exe -kernel kernel-qemu -cpu arm1176 -m 256 -M versatilepb -no-reboot -serial stdio -append "root=/dev/sda5 panic=1 rootfstype=ext4 rw" -hda ArchLinuxARM-2014.02-rpi.img
- All should start and you can log in with username root and password root
- Check your swap with
free -m
You’re done. You new have a QEMU system emulating Arch Linux. Update Arc with pacman to get all of the latest goodness.


